How to Compress an Image to 100KB, 50KB or 20KB (Exact Size, Batch, No Upload)
Job portals, visa and government application forms, school admissions, exam registrations, and a lot of older web systems all have the same kind of rule: photo must be under 100KB, or 50KB, or sometimes as low as 20KB. A modern phone photo is 3–6MB, so it’s 30 to 60 times too big, and a normal “compress” button that just lowers quality to 80% won’t get anywhere near that.
What you need is a tool that works backwards from the size limit: you give it the number, it finds the highest quality that still fits. Here’s how to do that for one image or a whole batch, plus the three situations where it quietly doesn’t work unless you do one more thing.
Compress to an exact size, step by step
- Open Batch Compress Images and add your photos. You can select several at once or drop a whole folder.
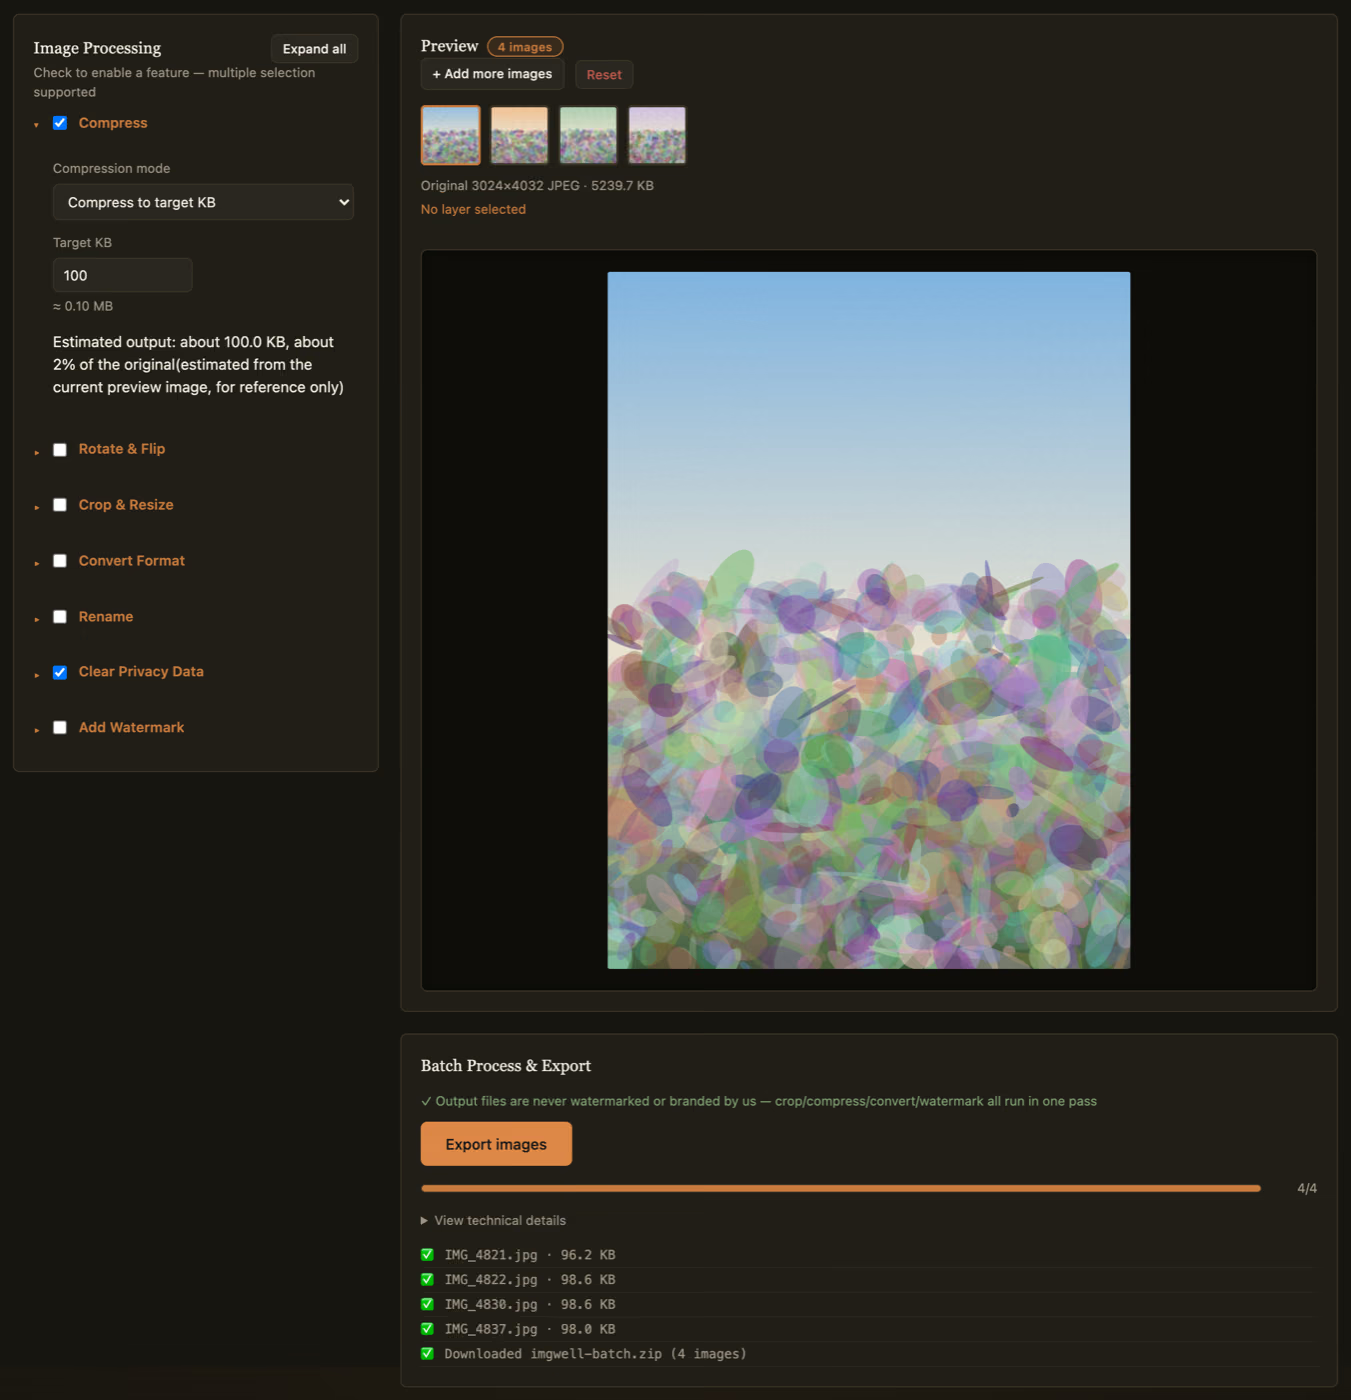
- Tick Compress, and set Compression mode to Compress to target KB.
- Type the limit into Target KB, for example
100. (Set it a little under the real limit; see the kilobyte note below.) - Click Export images. Each image is compressed separately to fit under the target, and the results download as a zip (or as a single file if you only added one).
The screenshot above is a real run: four 12-megapixel phone photos, each about 5.2MB, came out at 96–99KB with a 100KB target. Each file gets its own quality setting, so a busy photo and a plain one both land just under the limit instead of one being crushed and the other overshooting.
Nothing is uploaded. The compression runs in your browser, which matters when the images are ID photos, scanned documents, or anything else you’d rather not hand to a random website.
If the file is a PNG, convert it to JPG
This is the one that surprises people. PNG is a lossless format, so there is no “quality” to turn down, and target-size mode has nothing to adjust. In our test, a 3.9MB PNG screenshot with a 100KB target only came down to 344.6KB while it stayed a PNG.
The fix is to change the format in the same pass: tick Convert Format and pick JPEG. The same PNG then came out at 96.1KB. Most upload forms that ask for a small file expect a JPG anyway.
One caveat: JPG has no transparency. If your PNG is a logo or graphic with a transparent background, choose WebP instead, which also works with target-size mode and keeps the transparent areas.
For 50KB and under, shrink the dimensions too
Lowering quality only goes so far. A 12MP photo still has 12 million pixels to describe, and at some point the file can’t get smaller without also having fewer of them. Our test photo reached 46.5KB for a 50KB target, but for a 20KB target it bottomed out around 44KB, and a 10KB target made no further difference.
Adding a resize in the same batch fixed it immediately:
| Target | Width | Result |
|---|---|---|
| 20KB | original (3024px) | about 44KB (too big) |
| 20KB | 1200px | 19.6KB |
| 20KB | 800px | 19.8KB |
| 10KB | 600px | 9.9KB |
To do this, tick Crop & Resize and enter a Target width (px). For 20KB, around 800–1200px wide is a good starting point. For 10KB, around 600px. For passport-style photos the form usually tells you the pixel size it wants anyway, so use that. A smaller image at decent quality also looks much better than a full-size image at the lowest quality, which tends to come out blocky.
The smaller the target, the more of the work the resize is doing. Below about 10KB, pick the width first and treat the KB target as a final check.
The kilobyte gotcha: why a 99KB file can still be rejected
“KB” means two different things. Like most software, this tool counts 1KB as 1,024 bytes, so a 100KB target allows files up to 102,400 bytes. Some upload forms count 1KB as 1,000 bytes, so to them “100KB” means 100,000 bytes.
In our runs, a file shown as 98.6KB was 100,966 bytes, and a “19.6KB” file was 20,042 bytes. Both would be rejected by a form that counts in thousands. You can’t tell from the outside which way a form counts, so leave a margin: enter 95 for a 100KB limit, 47 for 50KB, 19 for 20KB. The quality difference is invisible, and the rejection is avoided.
Quick answers
Will it make a small image bigger? No. If an image is already under the target, the tool won’t re-encode it up to the limit; it stays at or below its original size.
Can I compress to a size in MB instead? Yes, just enter it in KB (1MB = 1024KB). The field shows the MB equivalent underneath as you type.
Is the result always exactly the number I typed? It aims for the highest quality that fits under the number, so results usually land a few percent below it, like the 96–99KB files above.
If you’re trying to fit photos into an email rather than a form, compressing photos for Gmail’s 25MB limit covers that case. If the form wants a specific ID or passport photo size, see batch cropping passport photos to the right size.